Part 5: Trampoline Hooking to Capture Entity Positions
What is Trampoline Hooking?
So far, we’ve played with detours and code caves. But now we’re stepping into trampoline hooking.
The name is pretty self-explanatory: imagine program execution running along smoothly, then suddenly hitting our hook. Instead of just overwriting instructions permanently, we “bounce” execution away (into our own custom code allocated with VirtualAllocEx), do what we need, and then jump back into the original function flow (just after our hook), just like landing back on the trampoline.
The Plan:
Our target is a function instruction that accesses the Z-axis of entities. By trampoline hooking it, we can capture every entity that passes through this code. That way we build up a clean list of entity positions we can later use for world-to-screen ESP rendering.
We can’t simply overwrite the instruction permanently, that would break the game’s logic. Instead, we’ll:
- Redirect execution at the Z-axis instruction into our allocated memory.
- Inside our hook, log which entity triggered this instruction and execute instructions overwritten by our hook.
- After we’ve done our work, trampoline execution back into the original flow of the game, so nothing breaks.
Let’s begin
The Hook
Let’s start with how we are going to hook:
For this hook, we’re not going to rely on a code cave. Instead, we’ll dynamically allocate memory inside the game process using the Windows API function VirtualAllocEx. This function lets us carve out a chunk of memory in the target process and mark it as executable, so we can safely drop in our own custom code.
Let’s start with getting:
- Process ID
- Module Base Address
- Handle to the Process
Setting Up Memory for the Trampoline
Now, we allocate some executable memory inside the game with VirtualAllocEx.
for our case i will use VirtualAllocEx with these arguments:
- hProcess → the handle we opened with OpenProcess.
- NULL → we’re not picky about the address; Windows picks a safe spot.
- 128 → just enough space for our trampoline code and a jump back.
- MEM_COMMIT & MEM_RESERVE → allocate and commit memory in one call.
- PAGE_EXECUTE_READWRITE → we need the memory to run code, so it must be executable.
- reserve → Pointer to our Allocated Memory
If you want to learn more beyond this breakdown: MSDN VirtualAllocEx
Hooking the Z-Axis Instruction
First we have to find our z coordinate in cheat engine. We can do so by going up and down on a slope in game and increase and decrease just like
what we did to find our view matrix but instead of looking up and down we make our player move up and down.
After narrowing down our results we can lock the value in cheat engine to see which address makes it so that our player is locked in place (with
respect to the Z-axis).
Now we can see which instructions access our Z-axis:
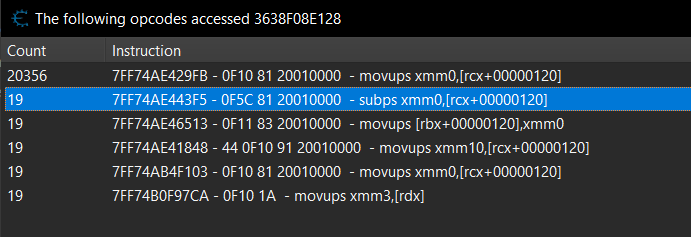
I’m going to use the second instruction seen here just due to it being the most reliable one from testing.
Looking at the disassembly:
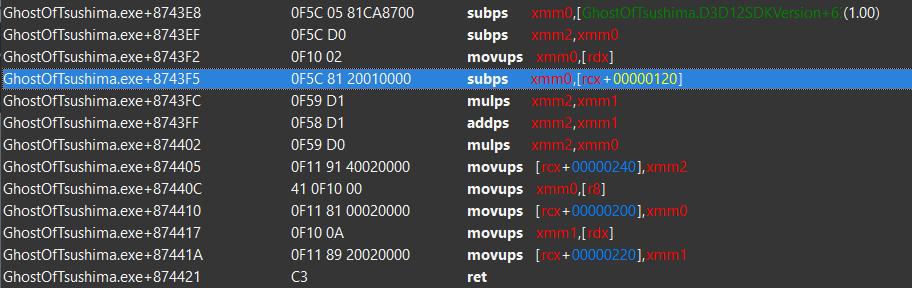
Let’s start counting how many bytes we need. We require 12 bytes for a full, mov reg; jmp reg hook.
Counting bytes we get:
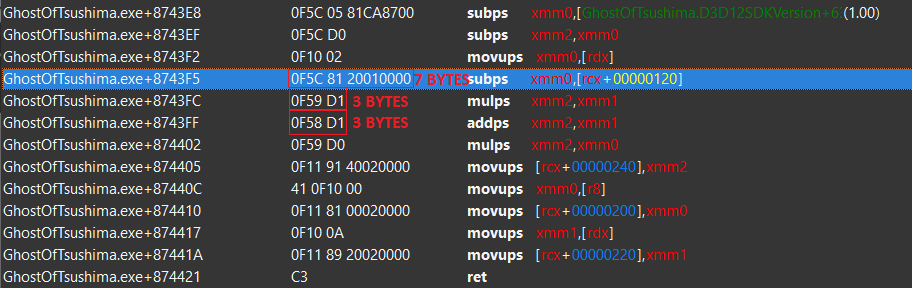
7+3+3 = 13;
So we have 12 bytes so we need to nop 1 byte to prevent spillover.
Writing the Trampoline
Now that we have the essentials set up (Process ID, Module Base Address, Process Handle, and a pointer to our allocated memory from VirtualAllocEx stored in reserve), it’s time to actually build the trampoline.
The trampoline has two jobs:
- Preserve the original instructions we overwrite when inserting our jump.
- Redirect execution into our allocated memory, run our custom code, then “bounce” back just after the jump
Step 1: Backing Up Overwritten Bytes
When we inject a jump at the target instruction, we overwrite some of the game’s original instructions. If we don’t restore them later inside our trampoline, the game will break because those instructions were never executed.
So, first we read and store those original bytes. In this case, we need to restore 13 bytes.
Now we have a safe copy of the instructions we’re about to overwrite.
Step 2: Writing the Jump
We need to insert an absolute jump to our allocated trampoline. The standard 5-byte relative jump instruction (E9 rel32) is inadequate because VirtualAllocEx rarely allocates memory within the ±2GB range required for relative addressing. Therefore, to encode the full 64-bit absolute address, which won’t fit in the initial 5 bytes, we must build the jump in two steps:
- Move the trampoline address into a register. We use mov rax, <address> (10 bytes). This loads the pointer to our allocated memory into rax.
- Jump via that register. Then we do jmp rax (2 bytes), which transfers execution to our trampoline.
Here’s the code that builds and writes that jump:
At this point, the original instruction at GhostOfTsushima.exe + 0x8743F5 no longer executes. Instead, execution now flows into our trampoline code (inside the memory block allocated with VirtualAllocEx).
Capturing & Storing Entities
To actually track every entity that hits our hooked instruction, we need a place to temporarily stash its pointer before our C++ code picks it up.
We’ll keep all unique entities in an unordered_set:
Allocating space for the “current entity”
First, we reserve a single 8-byte slot inside the game process where our hook can write the most recent entity pointer:
This will let us store our entities in the temporarily stash.
Writing to the slot in assembly Inside the game, rcx holds the current entity pointer. So our injected shellcode looks like this:
mov r10, <entityAddr>  ; load our reserved address into r10
mov [r10], rcx         ; store rcx (entity pointer) into [entityAddr]
⚠️ Why not just do mov [entityAddr], rcx?
Because x64 instructions can’t encode a full 64-bit absolute address directly. The only way is to load the address into a register (r10 here) and then store through that register.
Shellcode & Stolen Bytes
We build our shellcode then write our shellcode and the stolen bytes to our allocated memory:
At runtime, every time our hooked instruction is hit, the entity pointer in rcx gets stored at entityAddr.
Jump Back
We jump back to original instruction:
Now after execution of our payload and the stolen bytes in our allocated memory it jumps back to our original instruction as to not break flow of execution.
Reading entities back in C++
Now, our external process polls the reserved memory region (entityAddr) in the target process to monitor for new entity pointers:
uniqueEntities.find(curEntity) will return uniqueEntities.end() if no such data exits inside the unorderd map, then we simply insert it using uniqueEntities.insert(curEntity)
You could also check if curEntity has valid health, position or some specific flag to ensure only valid entities are passed into our unordered_set.
This way, every time the Z-axis instruction executes for some entity, we capture it once and stash it in uniqueEntities. Later, we can loop through this set and use their positions for ESP drawing.